Table of Contents
| Board | CBSE |
| Textbook | Code 843 |
| Class | 11 |
| Unit | 3 |
| Unit Name | Python Programming |
| Subject | Artificial Intelligence (843) |
Python Programming Class 11 AI — Complete PDF Notes
Introduction to Python
Python programming in class 11 AI is where things actually start to get hands-on. You stop just reading about artificial intelligence and start building things — even if it is just printing text or solving a small math problem on screen.
Python was created by Guido van Rossum and released in 1991. It got its name from a BBC comedy series called “Monty Python’s Flying Circus” — not from the snake, in case you were wondering.
Python is a general-purpose, high level programming language. This means it is designed to be readable, simple, and useful across almost every field — from web development to data science to machine learning.
Features of Python
Python has some standout qualities that made it the top choice for the CBSE Class 11 AI curriculum. Understanding these features will help you appreciate why Python works so well for AI and data science projects.

- High Level Language — Python handles all the complex memory and hardware work behind the scenes. You only focus on solving the actual problem you came to solve.
- Interpreted Language — Python runs your code one line at a time instead of compiling everything first. As a result, errors are much easier to catch and fix.
- Free and Open Source — Python costs nothing to download, use, or distribute. In addition, a massive global community keeps improving the language every single day.
- Cross-Platform — Write your Python code once and it runs on Windows, Mac, or Linux without changes. However, a compatible Python interpreter must be installed on the system.
- Easy to Learn — Python’s syntax reads almost like written English. This is exactly why most schools, universities, and boot camps start programming with Python.
- Multiple Editors — You can write Python code in many environments: Python IDLE, PyCharm, Anaconda, Spyder, and Jupyter Notebook are all popular choices.
- Supports ASCII and Unicode — Python can process characters from every language in the world, not just English.
- Widely Used — From AI and machine learning to web development and data analysis, Python works across almost every technology domain today.
Python Editors
A Python editor is the software environment where you write and run your code. Several good editors exist — PyCharm, Spyder, IDLE, and Google Colab are all widely used. However, for the Class 11 AI course, Jupyter Notebook is the one you will work with the most.
What is Jupyter Notebook?
Jupyter Notebook is an open-source web application where you write code in cells, run each cell individually, and see the output appear right below it — all in the same window. It is widely used in data science, AI research, and education worldwide.
To install Jupyter Notebook, open your command prompt and type:
pip install notebookOnce installed, launch it by typing the following in your command prompt:
jupyter notebookThis opens a browser window where you type code inside cells and click Run to see the output. For full installation details, visit the official Jupyter installation guide.
Another very popular way to set up Jupyter Notebook is through Anaconda. Anaconda is a Python distribution that comes pre-loaded with all the major libraries used in AI and data science — including NumPy, Pandas, and Scikit-learn. It is the most common setup used in schools and colleges today.
Tokens in Python
Every Python program you write is made up of tiny individual units called tokens. Think of them like LEGO pieces — each one has a specific role, and together they build a working program.
A token is the smallest unit of a Python program that the interpreter can recognize and process. During execution, Python breaks your entire code into tokens first — this process is called lexical analysis.
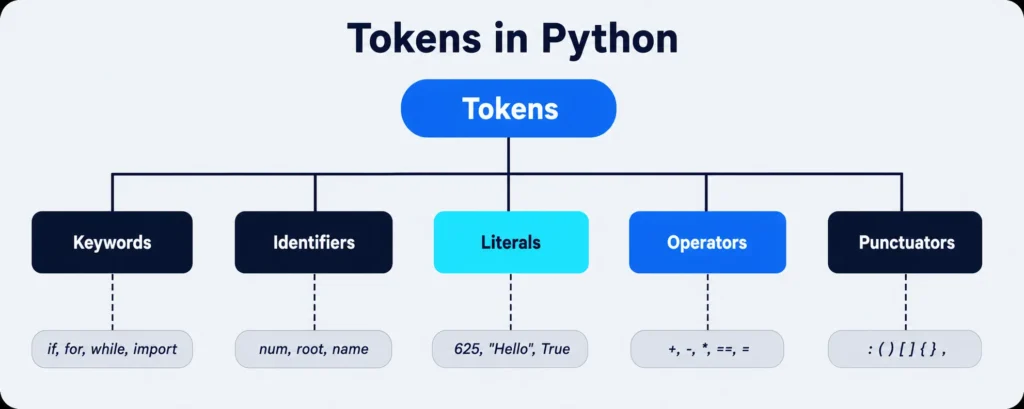
Python has five types of tokens: Keywords, Identifiers, Literals, Operators, and Punctuators.
Keywords
Keywords are reserved words that Python has already claimed for its own use. You cannot use them as variable names or identifiers — Python will throw an error if you try.
Here is the complete list of Python keywords you need to know for Class 11 AI:
| False | None | True | for | in | or | while |
| and | class | elif | from | is | pass | with |
| as | continue | else | global | lambda | raise | yield |
| assert | def | except | if | nonlocal | return | async |
| break | del | finally | import | not | try | await |
Identifiers
An identifier is a name you create and give to something in your program — a variable, a function, a class, or a module. For example, num, root, and name are all identifiers.
Unlike keywords, you get to decide what identifiers are called. However, there are a few rules you must follow when naming them.
Rules for writing identifiers in Python:
- An identifier cannot start with a digit. So
1nameis invalid, butname1is perfectly fine. - It can only contain letters, digits, and underscores. No special characters like @, #, or $ are allowed.
- Python keywords cannot be used as identifiers. For example, you cannot name a variable
fororif. - Identifiers are case-sensitive. This means
Nameandnameare treated as two completely different identifiers.
Quick Check: Look at this line of code — result = 10 + 5. Can you identify the identifier here? It is result. The values 10 and 5 are literals, and = plus + are operators.
Literals
Literals are the actual fixed data values you write directly in a program. They do not change during execution — what you write is exactly what Python uses.
Python supports five types of literals:
- String Literal — Text enclosed in single or double quotes. Example:
"Hello"or'Python' - Numeric Literal — Numbers, including integers and decimals. Example:
625,3.14 - Boolean Literal — Only two possible values. Example:
TrueorFalse - Special Literal — Python has exactly one special literal used to represent the absence of a value. Example:
None - Literal Collections — A group of values stored together as a single unit. Example:
[1, 2, 3](a list)
Operators
Operators are symbols or keywords that perform some operation on values and produce a result. Python supports seven categories of operators — more than most people realise at first.
| Type | Operators | Example |
| Arithmetic | +, -, *, /, % | 5 + 3 → 8 |
| Relational | ==, !=, <, >, <=, >= | 5 > 3 → True |
| Assignment | =, +=, -= | x = 10 |
| Logical | and, or, not | True and False → False |
| Bitwise | &, |, ^, <<, >> | 5 & 3 → 1 |
| Identity | is, is not | x is y |
| Membership | in, not in | ‘a’ in ‘apple’ → True |
Punctuators
Punctuators are special symbols that define the structure and flow of your code. They group values, separate statements, and mark where blocks begin or end.
Common Python punctuators include:
: ( ) [ ] { } , ; . ' ' " " / \ & @ ! ? | ~Tokens in Action — A Complete Example
Here is a real Python program that finds the square root of a number. Every token type appears somewhere in this code — see if you can spot them before reading the breakdown below.
import math
num = 625
root = math.sqrt(num)
print("Square root= ", root)
Output: Square root= 25.0
Tokens identified in the program above:
- Keyword →
import - Identifier →
num,root(these are the variable names you created) - Literal →
625 - Operator →
= - Punctuator →
" ",( ),.
A few more things this program shows you: print() displays output on the screen. The import keyword loads the math library so Python can access its built-in functions like sqrt(). Variables like num and root are named labels that store values during program execution.
Sample Programs
Sample Program 1 — Display a String
Display the text “National Animal – Tiger” on the screen.
print("National animal - Tiger")Output: National animal – Tiger
Sample Program 2 — Area of a Rectangle
Write a program to calculate the area of a rectangle where the length is 12 and the breadth is 7.
length = 12
breadth = 7
area = length * breadth
print("Area of Rectangle=", area)
Output: Area of Rectangle= 84
Notice how length, breadth, and area are all identifiers — names you gave to store values. The * is the arithmetic operator doing the multiplication, and print() shows the final result.
Before moving into data types, it is worth having a look at the broader AI concepts that set the context for everything Python does in this course — you can find those on the Class 11 AI notes page on aiforkids.in.
Data Types in Python
Every piece of data you store in a Python program has a type. That type tells Python what kind of value it is and what operations are allowed on it. Because of this, understanding data types is one of the most important foundations in python programming class 11 AI.
Python uses something called Dynamic Typing. This means you do not need to declare the type yourself — Python figures it out automatically from the value you assign. This is why Python is often called a dynamically-typed language.
For example, if you write x = 10, Python instantly knows x is an integer. If you write x = "Hello", Python now knows it is a string — without you ever telling it manually.
Data Type Descriptions with Examples
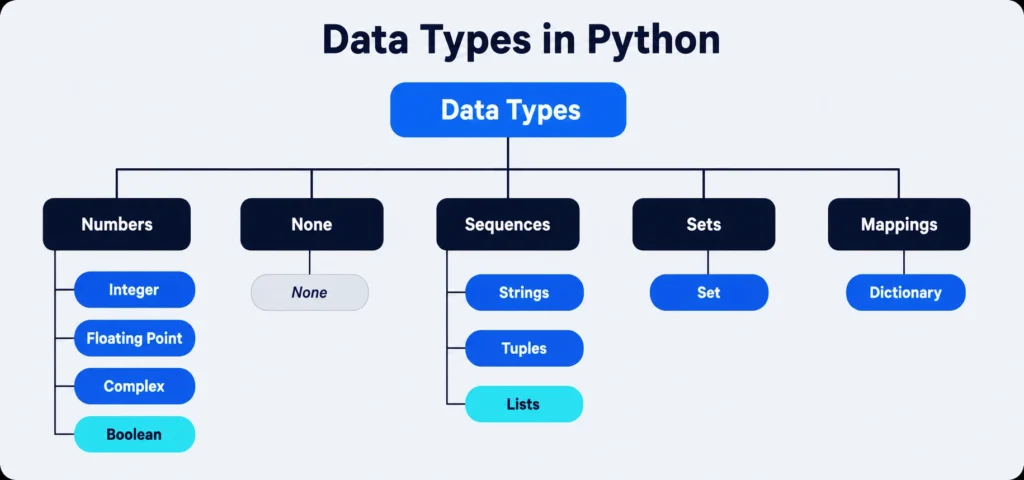
Here is a clear breakdown of every built-in data type in Python, what it stores, and a quick example for each:
| Data Type | What It Stores | Example |
| Integer | Whole numbers without any decimal part | a = 10 |
| Boolean | Represents only True or False values | result = True |
| Floating Point | Numbers that have a fractional (decimal) part | x = 5.5 |
| Complex | Numbers with a real part and an imaginary part | num = a + bj |
| String | Immutable sequence of characters in quotes. Values cannot be changed after creation. | name = "Ria" |
| List | Mutable sequence of comma-separated values of any data type, inside square brackets [ ] | lst = [25, 15.6, "car", "XY"] |
| Tuple | Immutable sequence of comma-separated values of any data type, inside parentheses ( ) | tup = (11, 12.3, "abc") |
| Set | Unordered collection of unique values with no duplicates | s = {25, 3, 3.5} |
| Dictionary | Unordered collection of key:value pairs inside curly braces { } | dict = {1:"One", 2:"Two"} |
Quick way to remember List vs Tuple:
Both store a collection of values. The key difference is that a List is mutable — you can change its values after creating it. A Tuple is immutable — once created, the values are locked and cannot be modified. Think of a Tuple as a sealed box and a List as an open one.
Accepting Values from the User
So far, all values in your programs were typed directly into the code. However, real programs need to work with values the user provides while the program is running. Python handles this with the input() function.
The input() function pauses the program, displays a message to the user, waits for them to type something, and then returns whatever they typed — always as a string, regardless of what the user entered.
Example: name = input("What is your name?")
Because input() always returns a string, you need to convert the returned value if you want to use it as a number. This conversion process is called type casting.
For example, int(input("Enter a number")) first takes the user’s input as a string, then converts it into an integer before storing it. In addition, float(input(...)) converts it into a decimal number.
What is Type Casting?
Type casting is the explicit conversion of one data type into another. You are not changing the data itself — you are telling Python to treat it as a different type for the rest of the program.
| Function | Converts To | Example |
int() | Integer | int("10") → 10 |
float() | Floating Point | float("3.5") → 3.5 |
str() | String | str(100) → "100" |
Sample Program 3 — Read Student Marks and Display Total
Write a program to read a student’s name and marks for three subjects, then display the total marks.
name = input("Enter Student's Name")
m1 = float(input("Enter the Mark of English"))
m2 = float(input("Enter the Mark of Artificial Intelligence"))
m3 = float(input("Enter the Mark of Maths"))
Total = m1 + m2 + m3
print("Name : ", name)
print("Total Marks : ", Total)
Output:
Enter Student's Name  M J Anakha
Enter the Mark of English  99
Enter the Mark of Artificial Intelligence  100
Enter the Mark of Maths  96
Name :   M J Anakha
Total Marks :  295.0
Why does the total show as 295.0 and not 295? Because float() was used to convert the input. Even if the marks are whole numbers, the result is stored as a floating point value. This is normal and expected behaviour.
Control Flow Statements in Python
Until now, every program you have written ran line by line, top to bottom, every single time. However, real programs do not always work that way. Sometimes you need to skip certain steps, repeat a block of code, or make a decision based on a condition — and that is exactly what control flow statements handle.
Python supports three types of control flow: Sequence (the default top-to-bottom flow), Selection (decision-making using conditions), and Looping (repeating a block of code).
Selection Statements — if, if-else, if-elif-else
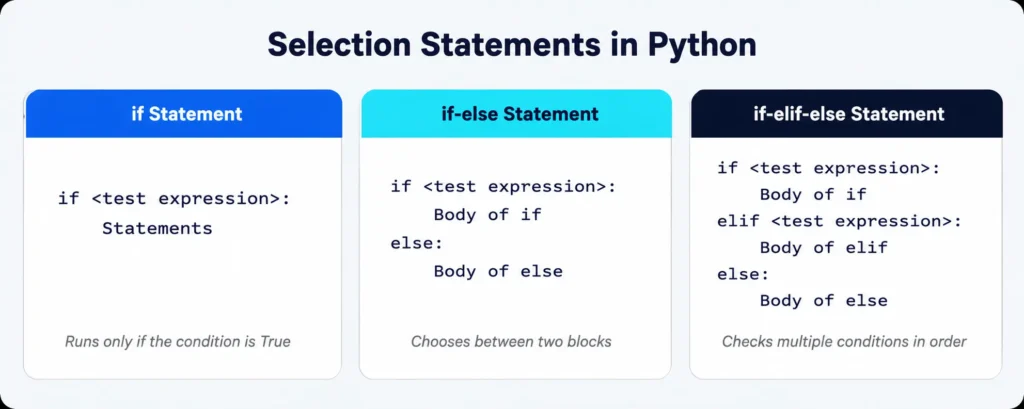
Selection statements let your program make decisions. Based on whether a condition is True or False, Python decides which block of code to run. Indentation is how Python identifies which lines belong to which block — so getting the spacing right is not optional.
Indentation in Python is not just for readability — it is part of the syntax. Python will throw an error if your indentation is inconsistent. Use 4 spaces (or one Tab) consistently inside every block.
Syntax — Three Forms of Selection
Sample Program 4 — Restaurant Food Menu (3 Cases)
Asmita went to a restaurant with her family. The program needs to display the correct restaurant section based on their food choice. This single scenario is used to demonstrate all three forms of selection — one case at a time.
Case 1 — Only one option (if)
All family members are vegetarian. There is only one option on the menu.
choice = input("Enter the choice of food")
if choice == "veg":
    print("Welcome to Vegetarian Food House")
Output: Enter the choice of food veg → Welcome to Vegetarian Food House
Case 2 — Two options (if-else)
Family members may choose non-vegetarian food if veg is not available.
choice = input("Enter the choice of food")
if choice == "veg":
    print("Welcome to Vegetarian Food House")
else:
    print("Welcome to Non-vegetarian Foods")
Output: Enter the choice of food Nonveg → Welcome to Non-vegetarian Foods
Case 3 — Multiple options (if-elif-else)
Family members can now choose from Veg, Nonveg, or Mixed options.
print("Menu: Veg | Nonveg | Mixed")
choice = input("Enter the choice of food")
if choice == "veg":
    print("Welcome to Vegetarian Food House")
elif choice == "Nonveg":
    print("Welcome to Non-vegetarian Foods")
else:
    print("Welcome to your Favourite Choice of Foods")
Output: Menu: Veg | Nonveg | Mixed → Enter the choice of food Mixed → Welcome to your Favourite Choice of Foods
Notice how the program checks conditions in order from top to bottom. The moment one condition is True, Python runs that block and skips everything else. Because of this, the order in which you write your elif conditions matters — always put the most specific condition first.
Sample Program 5 — Classify a Triangle
Write a program that reads the three sides of a triangle from the user and determines whether it is equilateral, isosceles, or scalene.
# Sample program to classify a triangle based on its sides

side1 = float(input("Enter the length of side 1: "))
side2 = float(input("Enter the length of side 2: "))
side3 = float(input("Enter the length of side 3: "))

if side1 == side2 == side3:
    print("It is an equilateral triangle.")
elif side1 == side2 or side1 == side3 or side2 == side3:
    print("It is an isosceles triangle.")
else:
    print("It is a scalene triangle.")
Output:
Enter the length of side 1: 7
Enter the length of side 2: 7
Enter the length of side 3: 11
It is an isosceles triangle.
Cross Question: What happens if all three sides are different? The if condition fails (not equal), the elif condition also fails (no two sides match), so Python falls into the else block and prints “It is a scalene triangle.” This is exactly how the if-elif-else ladder is supposed to work.
Looping Statements in Python
Looping statements let you run the same block of code multiple times without rewriting it. Python gives you two main loops — the for loop and the while loop. Each one is suited for a different situation, and knowing when to use which one is an important skill.
For Loop
A for loop iterates over a sequence — a list, a string, a range of numbers, or any ordered collection of items. Use the for loop when you already know how many times the loop needs to run.
Syntax of a for loop:
for <control-variable> in <sequence/items in range>:
    <statements inside body of the loop>
The for keyword starts the loop. The control variable takes on each value in the sequence, one at a time. The colon : marks the start of the loop body. Every statement inside the body must be indented.
Here are two simple examples to show how for loop works with range():
Example 1 — Print a word 5 times
for i in range(5):
    print("Python")
Output:
Python
Python
Python
Python
Python
Example 2 — Print numbers 0 to 4
for i in range(5):
    print(i)
Output:
0
1
2
3
4
Understanding range(5):
range(5)generates the values 0, 1, 2, 3, 4 — not 1 to 5. It always starts from 0 by default.- In Example 1, the variable
ichanges each time but we are not printing it — we are printing the word “Python”. So it prints 5 times. - In Example 2, we are printing
iitself. As a result, the output shows the actual values 0 through 4. - The for loop also terminates when you use a break statement inside the loop body — this exits the loop immediately regardless of remaining iterations.
Sample Program 6 — Even Numbers and Their Squares
Write a program to display even numbers between 100 and 110 along with their squares.
for num in range(100, 110, 2):
    square = num * num
    print(num, "squared is", square)
Output:
100 squared is 10000
102 squared is 10404
104 squared is 10816
106 squared is 11236
108 squared is 11664
Here range(100, 110, 2) starts at 100, stops before 110, and jumps 2 steps at a time — giving you only even numbers. The third value inside range is called the step.
Sample Program 7 — Display List Elements with Data Types
Write a program to read a list, display each element, and show its data type using type().
lst = [25, "fruit", 17.7, ('a', 'b'), 100]
for word in lst:
    print(word, type(word))
Output:
25 <class 'int'>
fruit <class 'str'>
17.7 <class 'float'>
('a', 'b') <class 'tuple'>
100 <class 'int'>
Notice that a single list can hold elements of completely different data types — integers, strings, floats, and even tuples all together. This is one of the most flexible things about Python lists.
The same program can also be written using index-based access: for i in range(len(lst)): print(lst[i], type(lst[i])). Here len(lst) gives the total number of elements, lst[0] is the first element, and lst[-1] is always the last element.
Sample Program 8 — Split a String into Words
Write a program to read a string, split it into individual words, and display each word on a new line.
Str = "Iam studying in Jyothis Central School"
wordlist = Str.split()
print("Words in list format", wordlist)
for word in wordlist:
    print(word)
Output:
Words in list format ['Iam', 'studying', 'in', 'Jyothis', 'Central', 'School']
Iam
studying
in
Jyothis
Central
School
The .split() method breaks a string at every space and returns a list of words. The for loop then goes through that list one word at a time and prints it.
While Loop
The while loop keeps running a block of code as long as a given condition remains True. Unlike the for loop where you know the number of iterations in advance, the while loop is best used when the number of repetitions depends on something happening during execution.
Syntax of a while loop:
while <condition>:
    <statements inside body of the loop>
Python checks the condition before every iteration. If it is True, the loop body runs. If it becomes False at any point, the loop stops. Make sure something inside the loop eventually makes the condition False — otherwise the loop runs forever, which is called an infinite loop.
Here is a simple example — print numbers 1 to 5 using a while loop:
i = 1
while i <= 5:
    print(i)
    i = i + 1
Output:
1
2
3
4
5
The variable i starts at 1. Each time the loop runs, it prints i and then increases it by 1. When i becomes 6, the condition i <= 5 becomes False and the loop exits.
Sample Program 9 — Display Dictionary Values
Write a program to display all values stored in a dictionary using a for loop.
dict = {'S1':'Bio-Math', 'S2':'Math-Comp', 'S3': 'Bio-Psy', 'S4': 'Math-AI'}
for key in dict:
    print(dict[key])
Output:
Bio-Math
Math-Comp
Bio-Psy
Math-AI
When you loop through a dictionary using for key in dict, the variable key takes on each key one at a time. To print the corresponding value, you write dict[key]. This is a very commonly used pattern in AI data processing where data is stored as key-value pairs.
Understanding CSV Files
Before you can use Python to do anything meaningful with data in AI projects, you need a way to store and retrieve that data. This is where CSV files come in — and they are used everywhere in real data science work.
CSV stands for Comma Separated Values. A CSV file stores tabular data — meaning data arranged in rows and columns — where each value is separated from the next by a comma.
It looks similar to a spreadsheet, but internally it is stored as plain text. Each line in a CSV file is one data record, and each record can have multiple fields (columns).
Datasets used in AI and machine learning projects are almost always stored in CSV format. Python’s built-in csv module gives you everything you need to read from and write to these files without installing anything extra.
You can also create CSV files easily by saving any spreadsheet — like a Microsoft Excel or Google Sheets file — with the .csv extension.
Working with CSV Files in Python
Here is a quick reference table for the most important CSV operations you need to know. The example file used throughout is student.csv, which contains the columns rollno, name, and mark.
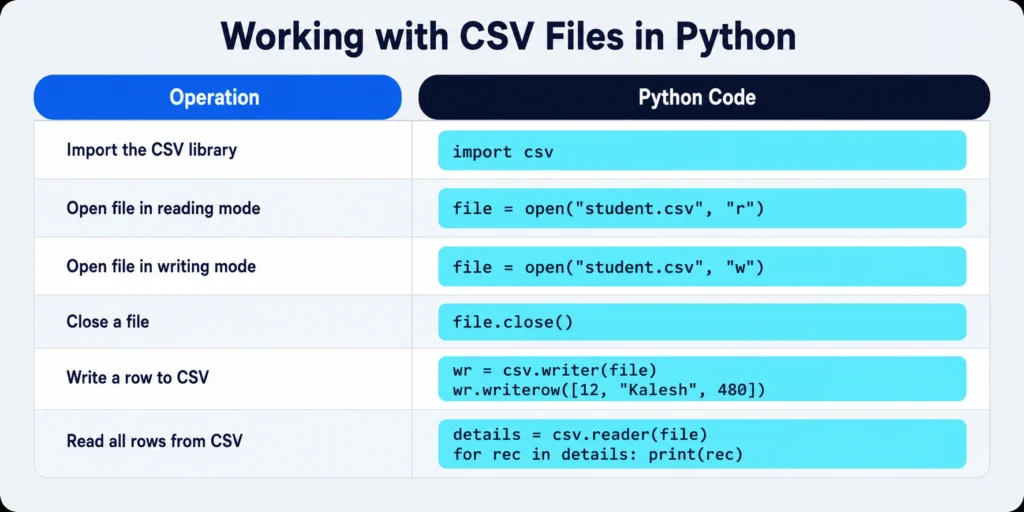
Sample Program 10 — Open and Display a CSV File
Write a program to open the file students.csv and display all its records.
import csv
file = open("D:\JPB\Python\students.csv", "r")
details = csv.reader(file)
for rec in details:
    print(rec)
Output:
['RollNo', 'Name', 'class', 'TrName']
['11', 'Akshith', 'II', 'Sruthy']
['12', 'Ashmitha', 'VII', 'Ruby']
['13', 'M J Anakha', 'X', 'Jayasankar']
Each row of the CSV file is returned as a Python list when you use csv.reader(). The very first row is usually the header row containing column names. Notice how every field — even numbers like RollNo — comes back as a string inside the list. You would need to use type casting if you want to do calculations with those values.
Python Libraries for AI
Here is something that makes Python genuinely special compared to most other programming languages — it comes with an enormous collection of pre-built tools called libraries. Instead of writing hundreds of lines of code to do something complex, you simply import a library and use functions someone else has already built and tested.
Think of it like a real library — books are already written and arranged by subject. You just walk in, find the section you need, and use the knowledge inside. In Python, the “math” library has functions like sqrt(), pow(), and sin(). To use any of them, you write import math at the top of your program.
For AI and data science specifically, three libraries are absolutely essential in python programming class 11 AI — NumPy, Pandas, and Scikit-learn. Each one solves a different problem in the data pipeline.
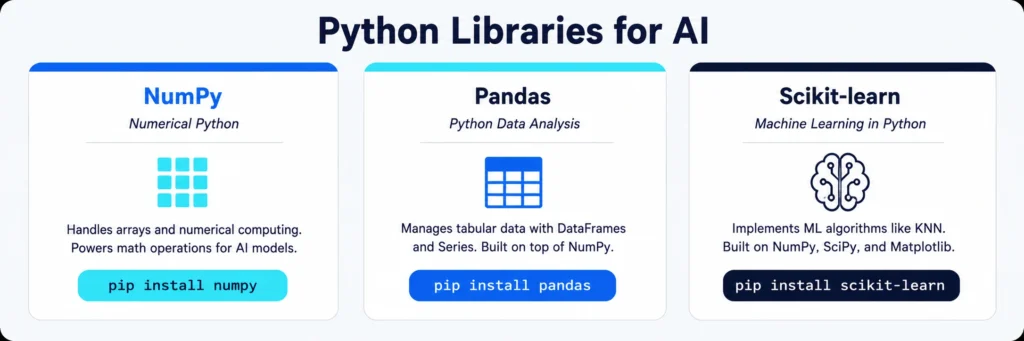
NumPy — Numerical Python
NumPy stands for Numerical Python. It is the foundation library for almost all numerical computing in Python — and because AI models work heavily with numbers, NumPy ends up being used in nearly every AI project you will ever build.
The most important thing NumPy provides is a data structure called the ndarray — short for N-dimensional array. An ndarray can store numbers in any shape: a flat list, a table of rows and columns, or even a multi-layered cube of values. All elements in an ndarray must be of the same data type.
Where is NumPy used in AI?
Imagine you have a dataset of exam scores for 100 students across 5 subjects. You could store all those scores in a NumPy array and then — in just one line each — calculate the average score per subject, find the highest and lowest scores, and compute each student’s total. Operations that would take dozens of lines in plain Python take just one with NumPy. This is why NumPy is called an indispensable tool for data science and AI.
To install NumPy, open your command prompt or terminal and type:
pip install numpyTo use NumPy in your program, import it at the top. The standard convention across the entire data science world is to import it as np:
import numpy as npCreating NumPy Arrays
NumPy arrays can be created in multiple ways depending on your situation. Here are the two most common methods you need to know for Class 11 AI.
Method 1 — Using a List of Tuples
import numpy as np
ar = np.array([ (99, 88, 77), (44, 55, 66)])
print("Numpy Array:\n", ar)
Output:
Numpy Array:
 [[99 88 77]
 [44 55 66]]
The result is a 2D array — two rows and three columns. Each tuple becomes one row in the array. This is exactly the kind of structure you would use to store a dataset with multiple records.
Method 2 — Using Values from the User with empty()
The empty() function creates an array of a given size first, and then you fill it with values the user enters one at a time.
import numpy as np
n = int(input("Enter the size of an array"))
ar = np.empty(n)
for i in range(n):
    ar[i] = int(input("Enter a number"))
print("Array\n", ar)
Output:
Enter the size of an array  4
Enter a number  34
Enter a number  67
Enter a number  85
Enter a number  92
Array
 [34. 67. 85. 92.]
Notice the output shows 34. 67. 85. 92. with decimal points — not 34, 67, 85, 92. This is because np.empty() creates a float array by default. The values are stored as floating point numbers even though you entered whole numbers. This is expected NumPy behaviour.
Pandas — Python Data Analysis
The name Pandas comes from two things — “Panel Data” and “Python Data Analysis”. It is a powerful library built on top of NumPy, which means it inherits all of NumPy’s speed and adds a much friendlier way to work with tabular data — the kind that looks like a spreadsheet with rows, columns, and labels.
Pandas is particularly well-suited for structured datasets like CSV files, SQL tables, and Excel sheets. It is the go-to tool for data cleaning, exploration, and preparation before feeding data into any machine learning model.
Where is Pandas used in AI?
Suppose a company wants to analyse the performance of different marketing campaigns. The dataset contains campaign type, budget, reach, and sales figures. Pandas loads this dataset, lets you display summary statistics, group data by campaign type, and visualise patterns — all before any AI model touches the data. This is why Pandas is called a core part of the AI data pipeline.
Install Pandas using:
pip install pandasImport it in your program using the standard convention:
import pandas as pdTwo Core Data Structures in Pandas
Pandas provides two primary data structures. Understanding the difference between them is the first thing you need to get right before working with any dataset.
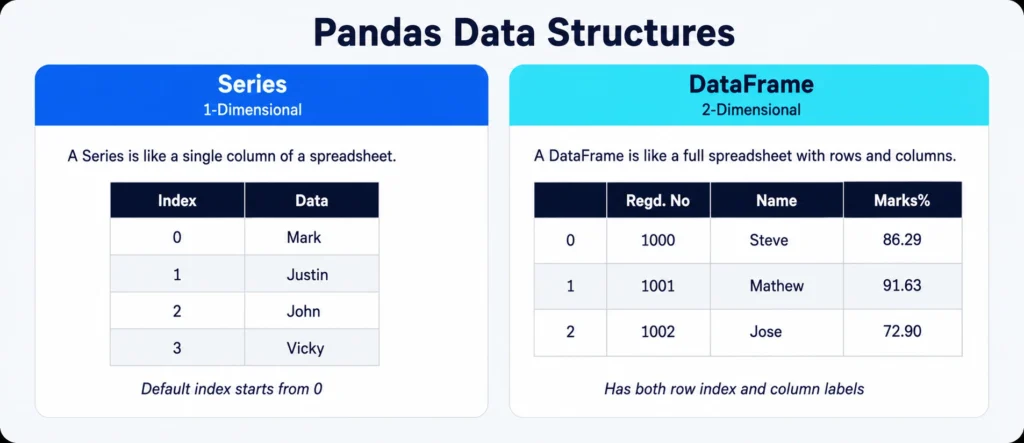
Creating a DataFrame
There are several ways to create a DataFrame in Pandas. Here are the two most commonly used methods in Class 11 AI.
Method 1 — Using NumPy Arrays
import numpy as np
import pandas as pd

array1 = np.array([10, 20, 30])
array2 = np.array([100, 200, 300])
array3 = np.array([-10, -20, -30])

dFrame = pd.DataFrame([array1, array2, array3], columns=['col1', 'col2', 'col3'])
print(dFrame)
Output:
   col1  col2  col3
0    10    20    30
1   100   200   300
2   -10   -20   -30
Method 2 — Using a List of Dictionaries
import pandas as pd

listDict = [{'Dance':10, 'Music':20}, {'Dance':15,'Music':10,'Painting':20}, {'Painting': 12}]
a = pd.DataFrame(listDict, index=['X', 'XI', 'XII'])
print(a)
Output:
     Dance  Music  Painting
X     10.0   20.0       NaN
XI    15.0   10.0      20.0
XII    NaN    NaN      12.0
Three important things to know about this output:
- Dictionary keys automatically become column labels in the DataFrame.
- Where a value is missing for a column, Pandas fills it with NaN — which stands for “Not a Number”. This represents missing data.
- To check for NaN values in a DataFrame, Pandas provides the isnull() function.
Working with Rows and Columns in a DataFrame
Once you have a DataFrame, the most common operations involve adding, accessing, and deleting rows and columns. All examples below use the following DataFrame called Result, which stores student marks:
        Rajat  Amrita  Meenakshi  Rose  Karthika
Maths      90      92         89    81        94
Science    91      81         91    71        95
Hindi      97      96         88    67        99
Adding a New Column
Result['Fathima'] = [89, 78, 76]
print(Result)
You add a new column simply by assigning a list of values to a new column name in square brackets. The list must have the same number of values as there are rows in the DataFrame.
Adding a New Row
Result.loc['English'] = [90, 92, 89, 80, 90, 88]
print(Result)
New rows are added using the .loc[] accessor with the new row label as the key. The values you provide map to each column in order.
Deleting Rows and Columns
Pandas uses the .drop() method for both rows and columns. The axis parameter tells Python whether you are deleting a row or a column.
# Delete a row — axis=0
Result = Result.drop('Hindi', axis=0)
print(Result)

# Delete multiple columns — axis=1
Result = Result.drop(['Rajat','Meenakshi','Karthika'], axis=1)
print(Result)
Simple way to remember: axis=0 means rows (going downward), axis=1 means columns (going across). During data analysis, DataFrame.drop() is your primary tool for removing unwanted rows and columns from a dataset before feeding it into a machine learning model.
Accessing DataFrame Elements
Pandas gives you two main ways to access specific rows or elements inside a DataFrame. Knowing when to use each one will save you a lot of confusion during your practicals.
| Accessor | How It Works | Example |
.loc[] | Access using label names — the actual row or column name you can see | Result.loc['Science'] |
.iloc[] | Access using integer position — the index number starting from 0 | Result.iloc[1] |
Both Result.loc['Science'] and Result.iloc[1] return the same row in the Result DataFrame, since ‘Science’ is the second row (index position 1). However, loc uses the label and iloc uses the position number.
Understanding Missing Values (NaN)
Missing data is a very common problem in real datasets. Someone might leave a form field blank, a sensor might fail to record a value, or certain attributes simply do not apply to every record. In Pandas, all missing values are stored as NaN (Not a Number).
Here is a quick reference for the most important missing value operations in Pandas, using a DataFrame called StudCCA:
| Task | Code | Result |
| Check for missing value in a column | StudCCA['Music'].isnull().any() | True / False |
| Count total NaN values in DataFrame | StudCCA.isnull().sum() | Number (e.g. 3) |
| Delete all rows that contain NaN | StudCCA.dropna() | Cleaned DataFrame |
| Replace all NaN values with a number | StudCCA.fillna(1) | NaN replaced by 1 |
DataFrame Attributes
Attributes are built-in properties of a DataFrame that give you information about its structure without running any calculation. The syntax is always DataFrame_name.attribute.
All examples below use a DataFrame called Teacher, which stores teacher names assigned to subjects across classes IX to XII.
| Attribute | What It Returns | Code |
.index | All row labels (index) | Teacher.index |
.columns | All column labels | Teacher.columns |
.dtypes | Data type of each column | Teacher.dtypes |
.values | All data as a NumPy array | Teacher.values |
.shape | Total rows and columns as (row, col) | Teacher.shape → (3, 4) |
.head(n) | First n rows of the DataFrame | Teacher.head(2) |
.tail(n) | Last n rows of the DataFrame | Teacher.tail(2) |
head() and tail() are two of the most frequently used methods when you first load any dataset. They let you quickly preview the data before running any analysis — kind of like flipping open a few pages of a book before deciding what to read carefully.
Importing and Exporting CSV Files with Pandas
One of the most common tasks in any AI project is loading data from a CSV file into a Pandas DataFrame, working with it, and then saving the result back as a CSV file. Pandas makes both operations very straightforward.
Reading a CSV File into a DataFrame
import pandas as pd
import csv

df = pd.read_csv("D:\JPB\Python\students.csv", sep=",", header=0)
print(df)
Output:
   RollNo        Name class     TrName
0      11     Akshith    II     Sruthy
1      12    Ashmitha   VII       Ruby
2      13  M J Anakha     X  Jayasankar
Three parameters to understand in pd.read_csv():
- sep — specifies the character that separates values. The default is a comma, but CSV files sometimes use semicolons or tabs instead.
- header=0 — tells Pandas that the first row of the file contains the column names. This is the default behaviour.
- The file path must be the exact location of your CSV file on your computer.
Saving a DataFrame to a CSV File
Teacher.to_csv(path_or_buf='C:/PANDAS/resultout.csv', sep=',')This saves the entire Teacher DataFrame as a CSV file at the specified path. When you open it in any text editor or spreadsheet, you will see all the row labels and column headers separated by commas — exactly as they appear in the DataFrame.
For more hands-on practice with Python data handling, the Class 11 AI notes section on aiforkids.in covers related topics that connect directly to what you are learning here.
Scikit-learn — Machine Learning in Python
You have learned how NumPy handles numbers and how Pandas manages data. Now comes the part where the data actually gets used to make predictions — and that is where Scikit-learn steps in.
Scikit-learn, commonly called Sklearn, is the most widely used machine learning library in Python. It gives you ready-to-use implementations of dozens of ML algorithms — meaning you do not have to build them from scratch. It is built on top of NumPy, SciPy, and Matplotlib, so it fits naturally into the same workflow you have already been learning.
Key features of Scikit-learn:
- Offers a wide range of supervised and unsupervised learning algorithms ready to use.
- Provides tools for model selection, evaluation, and validation.
- Supports classification, regression, clustering, and dimensionality reduction tasks.
- Integrates seamlessly with NumPy, SciPy, and Pandas — no extra bridging needed.
Install Scikit-learn using:
pip install scikit-learnIn Class 11 AI, you will use Scikit-learn to implement a classic machine learning workflow — load a dataset, split it into training and testing sets, train a classifier, and measure how accurately it predicts. Each of these steps uses a specific Scikit-learn module, and you will see all of them come together in the complete program at the end of this section.
The Iris Dataset — sklearn.datasets
Before any machine learning model can learn anything, it needs data. The dataset used in this chapter is the Iris dataset — one of the most famous and widely used datasets in all of machine learning history.
The Iris dataset contains measurements of 150 iris flowers across three species. For each flower, four measurements are recorded — sepal length, sepal width, petal length, and petal width — all in centimetres. The goal of the ML model is to look at these four measurements and correctly identify which species the flower belongs to.
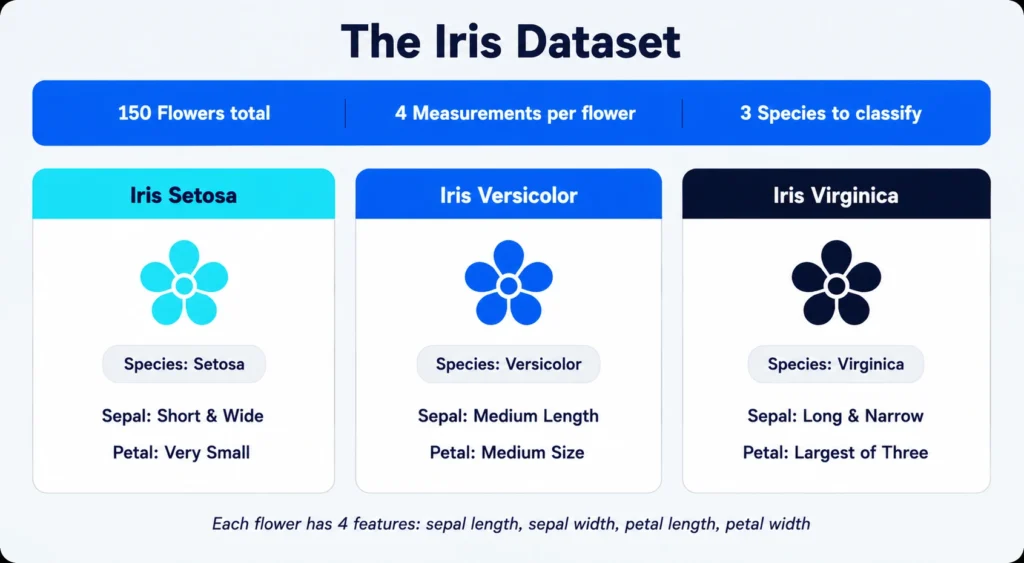
Scikit-learn comes with this dataset built in. You do not need to download it separately. Here is how you load it and understand what it contains:
| Code | What It Does |
from sklearn.datasets import load_iris | Imports the load_iris function from Scikit-learn’s datasets module |
iris = load_iris() | Loads the entire Iris dataset and stores it in the variable iris |
X = iris.data | Stores the feature vectors — the four measurements for each flower. This is the input your model will learn from. |
y = iris.target | Stores the target variable — the species label for each flower. This is what the model will try to predict. |
When you print the first 10 rows of X, you get output like this:
Feature names: ['sepal length (cm)', 'sepal width (cm)', 'petal length (cm)', 'petal width (cm)']
Target names: ['setosa' 'versicolor' 'virginica']

First 10 rows of X:
 [[5.1 3.5 1.4 0.2]
  [4.9 3.  1.4 0.2]
  [4.7 3.2 1.3 0.2]
  [4.6 3.1 1.5 0.2]
  [5.  3.6 1.4 0.2]
  [5.4 3.9 1.7 0.4]
  [4.6 3.4 1.4 0.3]
  [5.  3.4 1.5 0.2]
  [4.4 2.9 1.4 0.2]
  [4.9 3.1 1.5 0.1]]
Each row represents one flower. Each column is one measurement. For example, the very first row [5.1, 3.5, 1.4, 0.2] means: sepal length 5.1 cm, sepal width 3.5 cm, petal length 1.4 cm, petal width 0.2 cm.
Splitting the Dataset — train_test_split
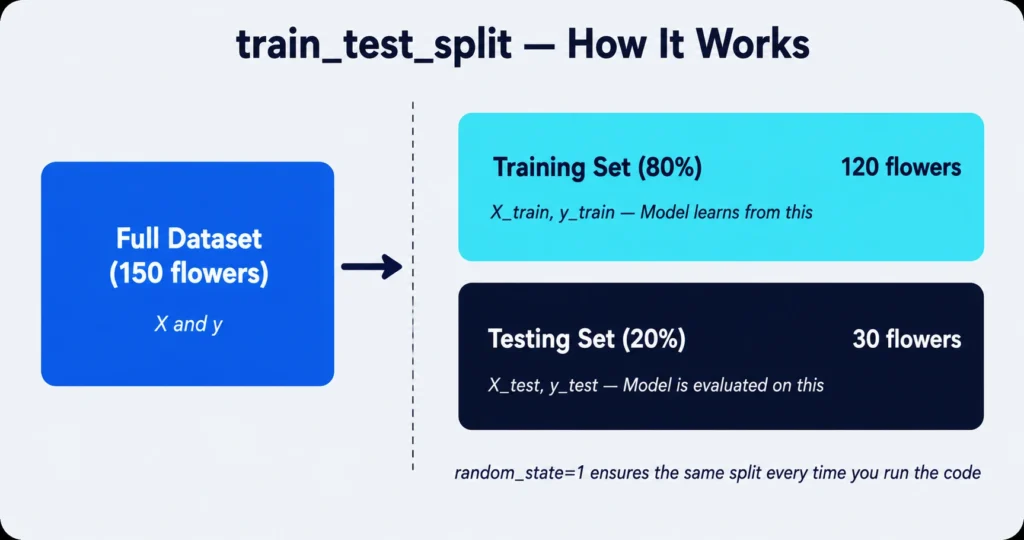
Here is a question worth thinking about — if you train your model on all 150 flowers, how do you know if it actually learned something useful, or if it just memorised the answers? You need a separate set of data the model has never seen before to test it on. This is exactly what train_test_split does.
It splits your dataset into two parts — a training set that the model learns from, and a testing set that the model is evaluated on. The most common split used in practice is 80% training and 20% testing.
| Parameter | What It Does |
from sklearn.model_selection import train_test_split | Imports the train_test_split function |
X_train, y_train | Feature vectors and target labels for the training set — the model learns from these |
X_test, y_test | Feature vectors and target labels for the testing set — used to evaluate the model |
test_size = 0.2 | Reserves 20% of data for testing, 80% for training |
random_state = 1 | Fixes the random seed so the split is identical every time you run the code |
KNN Classifier — KNeighborsClassifier
Now the model. In this chapter, the classification algorithm used is K-Nearest Neighbors — commonly called KNN. It is one of the simplest and most intuitive machine learning algorithms, which makes it a perfect starting point for Class 11 AI.
How does KNN actually work?
Imagine you move to a new city and you are not sure which neighbourhood you belong to. You look at the 3 closest houses to yours and see which area most of them are in — and that is your neighbourhood. KNN works exactly the same way. When it needs to classify a new flower, it looks at the K nearest flowers in the training data and assigns the species that appears most among those K neighbours.
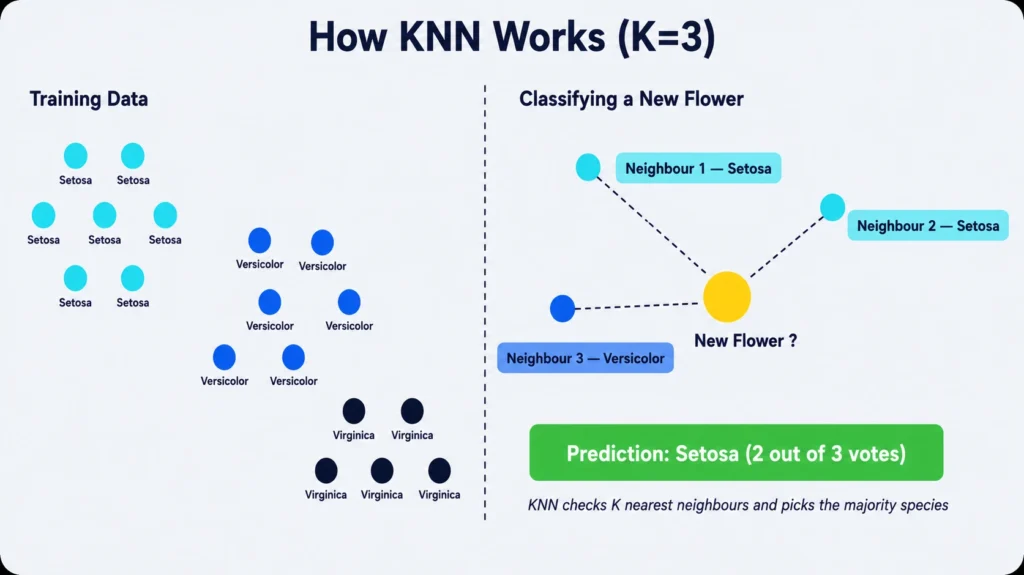
Here is how each step of KNN is implemented in Scikit-learn:
| Code | What It Does |
from sklearn.neighbors import KNeighborsClassifier | Imports the KNN classifier from Scikit-learn |
knn = KNeighborsClassifier(n_neighbors=3) | Creates a KNN model that will look at the 3 nearest neighbours when classifying. The value 3 is a hyperparameter — you can tune it to improve accuracy. |
knn.fit(X_train, y_train) | Trains the model using the training data. The model builds an internal representation of the training flowers so it can compare new ones against them. |
y_pred = knn.predict(X_test) | Uses the trained model to predict the species of each flower in the test set. The predictions are stored in y_pred. |
metrics.accuracy_score(y_test, y_pred) | Compares the model’s predictions against the actual labels and returns the proportion of correct predictions as a decimal (1.0 = 100% accuracy). |
The Complete ML Program — Putting It All Together
This is the full program that brings every piece together — loading data, splitting it, training a KNN model, evaluating accuracy, and making predictions on new sample data. Read through it carefully and match each section to what you have learned above.
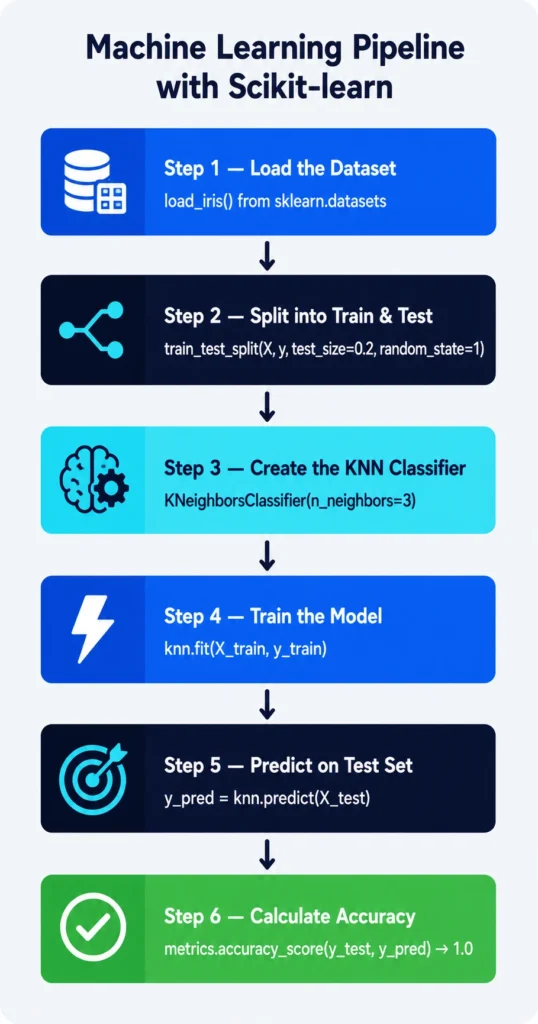
from sklearn.datasets import load_iris
from sklearn.model_selection import train_test_split
from sklearn.neighbors import KNeighborsClassifier
from sklearn import metrics

# Step 1 — Load the Iris dataset
iris = load_iris()
X = iris.data
y = iris.target

# Step 2 — Split the dataset into training and testing sets
X_train, X_test, y_train, y_test = train_test_split(X, y, test_size=0.2, random_state=1)

# Step 3 — Create and train the KNN classifier
knn = KNeighborsClassifier(n_neighbors=3)
knn.fit(X_train, y_train)

# Step 4 — Predict on the test set
y_pred = knn.predict(X_test)

# Step 5 — Calculate accuracy
accuracy = metrics.accuracy_score(y_test, y_pred)
print("Accuracy:", accuracy)

# Step 6 — Sample predictions on new data
sample = [[5, 5, 3, 2], [2, 4, 3, 5]]
preds = knn.predict(sample)
pred_species = []
for p in preds:
    pred_species.append(iris.target_names[p])
print("Predictions:", pred_species)
Output:
Accuracy: 1.0
Predictions: ['versicolor', 'virginica']
Breaking down the output:
- Accuracy: 1.0 means the model predicted every single flower in the test set correctly — 100% accuracy. This is possible with the Iris dataset because it is a clean, well-structured dataset designed for learning purposes.
- Predictions: [‘versicolor’, ‘virginica’] — when given two new flowers with measurements
[5, 5, 3, 2]and[2, 4, 3, 5], the trained KNN model identified the first as versicolor and the second as virginica by comparing them with the 3 nearest flowers in the training data. - The line
iris.target_names[p]converts the numeric prediction (0, 1, or 2) back into the actual species name — setosa, versicolor, or virginica.
Cross Question — A Common Confusion Cleared
Question: What is the difference between knn.fit() and knn.predict()? Students often mix these two up.
Answer: fit() is the learning step — you pass the training data to it and the model studies the patterns. predict() is the application step — you pass new data and the model uses what it learned to give you a prediction. You always call fit() first and predict() after. Calling predict() before fit() will throw an error because the model has not learned anything yet.
Quick Revision — All Modules Used in This Chapter
Before your exam or practical, here is a clean summary of every Scikit-learn module used in this workflow and what each one does:
| Module | What It Provides | Used For |
sklearn.datasets | load_iris() | Loading the Iris dataset |
sklearn.model_selection | train_test_split() | Splitting data into train and test sets |
sklearn.neighbors | KNeighborsClassifier() | Creating the KNN classification model |
sklearn | metrics.accuracy_score() | Evaluating how accurate the model is |
Explore Python Further
The programs in this chapter are a solid starting point, but Python has a lot more to offer. Here are some trusted resources to keep going:
- Programiz — Python Programming — one of the clearest beginner-friendly Python tutorial sites available.
- W3Schools — Python Tutorial — great for quick syntax references and short examples.
- GeeksForGeeks — Pandas Tutorial — covers Pandas in depth with many practical examples.
- Scikit-learn Official Tutorial — the best place to go once you are comfortable with the basics covered here.
- Pandas in 10 Minutes — a quick practical walkthrough straight from the official Pandas documentation.
Practice Programs
Work through these programs on your own. They cover all the key concepts from this chapter and match the pattern of questions that appear in CBSE Class 11 AI exams and practicals.
- Write a Tipper program where the user inputs the total restaurant bill. The program should then display the 15% tip amount and the 20% tip amount.
- Write a program to check whether the user is eligible for a driving licence. The user must be 18 or older to qualify.
- A car goes for service after every 15,000 km. Read the current kilometre reading from the user and display whether the car needs a service or not.
- Write a program to display the first ten even natural numbers using a for loop.
- Write a program to accept a Basic Salary from the user and calculate the Net Salary. Use: HRA = 30% of Basic, DA = 20% of Basic, PF = 12% of Basic. Net Salary = Basic + HRA + DA − PF.
- Write a program to create a Pandas Series from a NumPy array.
- Consider the file
admission.csvcontaining student data with columns Name, Class, Gender, and Marks. Write programs to: (a) create a DataFrame from the CSV, (b) display the first 3 rows, (c) display the details of a specific student, (d) display the total number of rows and columns, and (e) display only the Gender column.
This wraps up the complete Unit 3 Python Programming chapter for CBSE Class 11 AI. From tokens and data types all the way to building a working KNN classifier — you now have everything the syllabus requires. For related topics and other Class 11 AI units, visit the Class 11 AI notes page on aiforkids.in.